It’s yet another Crytpo Tutorial Thursday video. Today’s video is “How to Buy WTC”. If you are unfamiliar with WTC, it is the symbol for the cryptocurrency Waltonchain. WaltonChain is based off of an incredible technology and comes from some of the brightest minds in Korea & China. Asian cryptocurrencies such as IOTA & NEO have seen incredible progress and look for Waltonchain to be coming right behind them. Right now the price of WTC is hovering between $18 to $23, but ultimately it will probably get much closer to what NEO is at… which is well over $100 per coin.
One of the most important thing for crypto investors to learn how to do is how to read a candlestick chart in crypto. Without knowing how to read a chart, it is impossible for investors to make educated guesses on the movement of a cryptocurrency. One of the most widely used style of charts is the candlestick chart. On this chart, movement is marked by shapes that are referred to as candles & wicks. By looking at a candlestick chart, investors can easily determine the pattern that a coin has been on.
Coinigy is a very interesting platform. Before we give you our Simply Coinigy Tutorial, let’s look at what it is.
While we are going to focus on using the platform for chart reading & analysis, the platform actually does a lot more. The site proclaims itself as a “trade smart, trade simple, and trade safe” experience. Coinigy allows you to access digital currency services spanning across several different networks. Coinigy supports about 45 different exchanges. On this site, you can consolidate all of your trading accounts into one platform while keeping all of your accounts encrypted & secure. You can place orders for several different exchanges and track them all in one place. You will be able to keep up with your balances, deposit funds, and do analysis.
While you will be able to access your funds via this platform, all of your actual balances are still contained on their own exchanges. Coinigy does not store your coins on its platform. According to the platform, this provides a safer experience for all of their users. One advantage to using Coinigy is that you can compare prices & charts from several different exchanges and several different coins all at one time. This allows cryptocurrency investors to be able to make smarter and more informed decisions on where to put their investments.
So is Coinigy Worth It?
Several big money & crypto news sites have reviewed Coinigy such as Forbes, Coin Desk, MekongMoney, & others. Most reviews on Coinigy have actually been quite positive. One thing that seems to be a universal thought regarding Coinigy is that it is a very convenient & useful trading platform. However, it just hasn’t seemed to get the traction that it probably deserves. This is partly due to the fact that because of how many things the platform does, it can be quite confusing. There is just so much happening on your screen.
While Coinigy is generally seen as safe & secure, many people question it because it has lag & database issues. Imagine making a great market trend discovery & preparing to make your trade… only to find out that the information you were working with is outdated. In the ever changing & evolving cryptocurrency world, the intense volatility of the markets mean that you must have the most current (up to the second) information in order to trade properly.
For our purposes at the Online Business Realm, we are going to be using Coinigy strictly for creating chart analysis. We can look a little harder at Coinigy to see if there are some other advantages to using it. However, the chart analysis tools on this site are amazing. You can totally customize your charts to show the information that you feel like you need. This will help you to make predictive trades based on trends.
We hope you have enjoyed this article and that you will watch our “Simple Coinigy Tutorial”. It revolves around becoming familiar with all of their great chart analysis tools!
For last weeks Extra Crypto Friday video, we showed you a full tutorial on how to use the website Coinbase. For today’s video we are going to be focusing on a How to Use Binance Full Tutorial. Many people are very scared to make the jump from Coinbase to Binance or another exchange. If this is a place where you are then you should be commending yourself. Many people stay stuck at the previous step… which is making an actionable step and buying crypto even on Coinbase. Binance can be quite a bit more intimidating than Coinbase, though.
The thing that separates Binance from Coinbase in terms of an intimidation factor is the Markets page. For people who handle their own stock investments, learning to use a crypto exchange is pretty easy because there are a lot of similarities. However, many people interested in investing in cryptocurrency are not well versed in how to read an exchange, charts, volume, etc. For this reason, many people take one look at Binance or another exchange (such as Kucoin) and decide it is too daunting for them to begin. I know personally, when I went to Binance the first time even I was a little intimidated.
But here is my advice to you: Do not be intimidated. Easier said than done, right? Binance is a very easy platform that really only has a few different functions most people ever use. Here are the things you need to know to do on Binance to be able to trade there. Simply learn how to trade, how to deposit, & how to withdraw.
That’s pretty much all you need.
How to Trade on Binance
Trading on Binance is pretty easy. The first thing you need to understand when trading is what a trading pair is. A trading pair is a combination of two coins that you can exchange for one another. The three trading pairs partners you need to know on Binance are Bitcoin (BTC), Ethereum (ETH), & Binance Coin (BNB). To make your initial purchase for BNB, you already need to have BTC or ETH in your account. The reason you need to trade for BNB once you get on the site is because if you keep a few BNB coins in your account then the fees you are charged on exchanges will come out of your BNB coins. Why is this important? The reason this is great is because when you use BNB instead of other coins your fees are cut in half.
The exchange platform for Binance is very straight forward. The most important factor when trading is to make sure you choose Limit or Market. When you make a trade on Limit, then you are working on a bidding system and your trades will not go into effect immediately. When working a trade on the Market setting, your trades will go through immediately. If you are planning on day trading then this is very important to understand.
Thanks for reading. To learn more about exactly how to trade on Binance, watch our video, “How to Use Binance Full Tutorial.”
In many of the videos we do on our channel, the sites we visit and discuss require what is called Two Factor Authentication. Because of this, we thought it would be great to discuss how to use Authy. Authy is a phone app geared to help keep your online accounts secure with an extra layer of protection. Google Authenticator is another app that you can use, but here at the Online Business Realm, we stick to Authy and find it to be superior to Google Authenticator. Any site that requires 2FA will allow you to use Authy; even if it does not specifically say so.
If you have ever ran a social media account for a business, then you are going to want to know how to schedule social media posts with Buffer. Running social media accounts sounds very easy on the surface. Pull up an app on your phone, type in a few words, & you are done. However, anyone who thinks the process is actually that easy doesn’t know what they are talking about. Anyone can type in a few words for a status, but unless you are a celebrity, no one really cares that you are taking your dog for a walk.
People who engage with business social media accounts want value. They want the accounts they follow to provide them with content that adds to their lives. When business accounts spam social media platforms with offers, sales, promo videos, & more, people will simply unfollow them. As a business owner yourself, you must find a way to give your followers a regularly scheduled dose of valuable content. This takes a lot of research. You will want to find relevant images, memes, articles, & other content that your readers want to see.
Due to the intense level of workload it takes for a business social media account to be successful, it is absolutely pivotal that business owners either hire a full time social media expert or find an online social media posts scheduler. While the former option can get quite expensive, finding a scheduling program is much more cost effective. A good scheduler will run you between $9.99 to $79.99 per month. Unless you are managing hundreds of accounts, you should never pay anything outside of that range. One social media scheduler we found is Buffer. Our video shows you how to schedule social media posts with Buffer.
Buffer Social Media Scheduler
I discovered Buffer a few weeks ago, and I have really enjoyed using it. For 3 or less social media accounts, Buffer is totally free. One cool thing about Buffer is that it offers a free 14 day trial of one of its upgraded packages. With this package you can manage anywhere from 4-10 social media accounts from a combination of Twitter, Instagram, Facebook, LinkedIn, Google+, & Pinterest.
With Buffer, it is so easy to add social media posts. I have been exclusively using Buffer for Twitter & Facebook. With this program, the control of your schedule is in your hands. You can create a custom schedule to post any number of posts per day. You will want to research how many posts you want to do each day per platform. For instance, on Twitter it’s really ideal to post between 10 to 15 times per day. While on Facebook, 3 per day will be a good amount.
One of the problems I found with Buffer, however, is in regards to Instagram. Buffer does not currently have direct posting to Instagram. Buffer has a phone app that will send you reminders for you to post to Instagram according to your schedule. There is a feature where you can share images directly from your camera roll to Instagram to speed up the process. However, if you want to add text/hashtags then you are still going to have to type or copy them into Instagram manually. There is a note on Buffer that says that hopefully direct Instagram posting is coming down the pipeline.
We hope this post has been helpful. Thanks for reading!
Today we are continuing our series, Web Wednesdays. In today’s video we are going to be focusing on setting up your WordPress Theme. So this begs the question, what is a WordPress theme?
If this is your first time setting up WordPress, then it is important to understand what a theme is and what it does. The best way to think about it is an anatomical reference. Your blog is the “skin” to your website. It’s what people are going to see the moment they visit your page. Your functionality and content could be incredible, but without the right theme, people will quickly be turned off by your website… and most likely they will leave before they ever get the chance to look under the hood.
While your visitors will see your theme, the theme does also affect the functionality. Each theme comes with settings and/or customization options for things such as your header, sliders, menus, footer, widgets, & more. It is absolutely pivotal that you get to know all of the settings within your header. When I add a new theme to a website I’m working on, the first thing I do is go look at the settings. If the theme does not have settings I like then I will change the theme. There is nothing worse than working with a theme that does not have a lot of customization.
For instance, some themes only allow you to have a text based logo. Just imagine how frustrating it would be to make a beautiful website only to find that it won’t allow you to put your beautifully designed logo at the top of your page. Sure, you could add it within the content… but that is not the best way to brand your business.
Choosing Your WordPress Theme
There are so many different ways to find a WordPress theme. The first question you have to ask yourself is whether or not you would like to spend money on a theme. If you are comfortable paying for a theme, then I suggest strolling over to the Envato Market and searching their Themeforest themes. Most of the themes there run anywhere from $29 to $59. They are fairly priced and these are full themes that will also come with support. Personally, I love Themeforest themes.
If you are looking for a free theme, then you will be able to search within the WordPress platform. It’s easy to search within WordPress for a great theme. The issue with the free themes, is that most likely the themes you find are going to be “Lite” versions of premium themes. The goal of the Lite themes is to give you an idea of what the full version or premium version can offer you above and beyond what you get with the Lite theme. It’s basically a way for these themes to advertise their full version… which of course will come with a cost. Some of the free WordPress themes will offer everything you need, but more times than not you will end up frustrated.
Thanks for reading & don’t forget to check out our tutorial video, “Setting Up Your WordPress Theme.”
We have shown you how to buy several different cryptocurrencies in our videos, tutorials, & posts. However, we have yet to show you a full tutorial video on how to use Coinbase. Without an understanding of how Coinbase works, it will be difficult to understand any of our other videos. For that reason, we wanted to make this blog post to show you how to use Coinbase.
Coinbase is a simple website to use. However, for many people just the idea of making the jump from researching Bitcoin to buying Bitcoin can be a massive leap of faith. If you read our last post, then you know why we are big believers in Bitcoin & cryptocurrency. Try Coinbase out for yourself! It is a great site and cryptocurrency is a fun hobby.
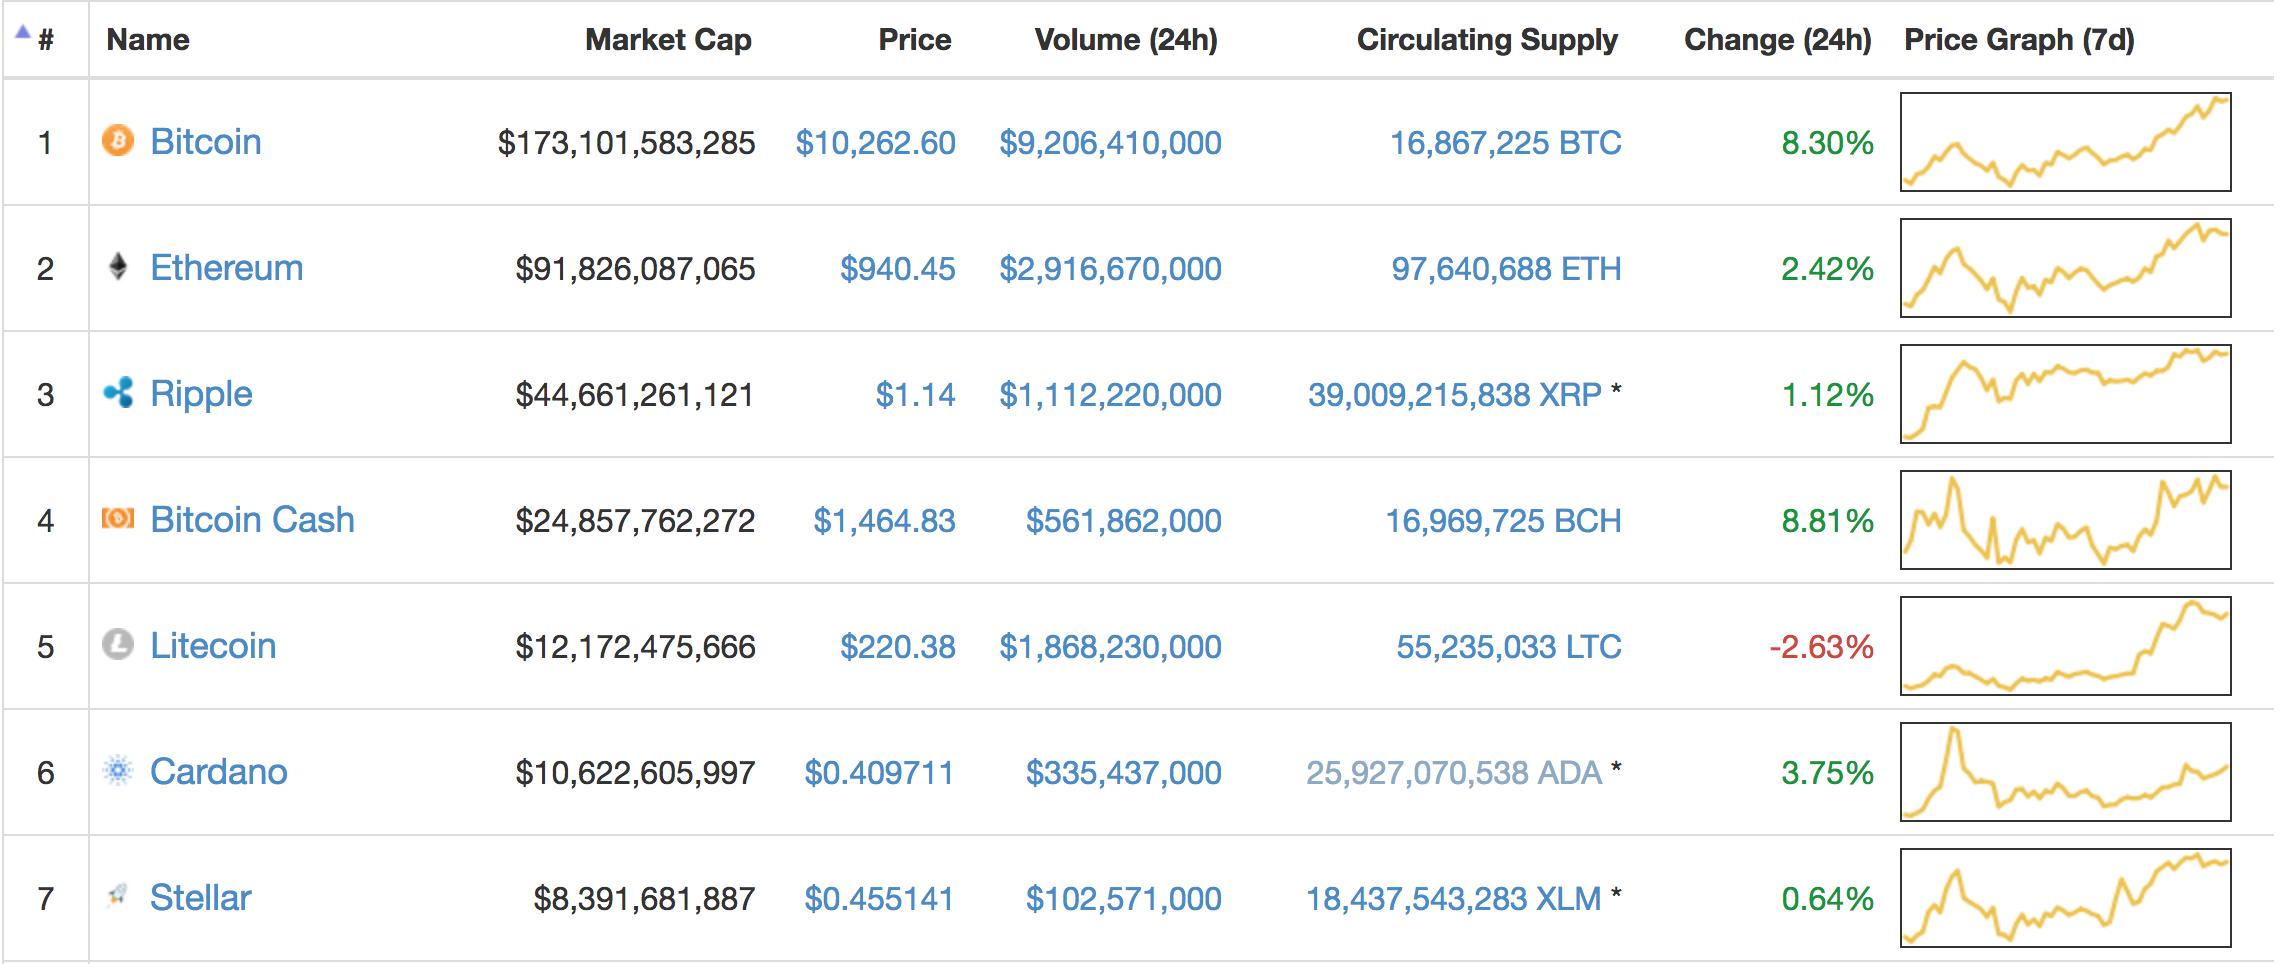
Coinbase has four cryptocurrencies currently listed on the site. They are Bitcoin, Ethereum, Litecoin, & Bitcoin Cash. These four cryptocurrencies make up four out of the top five cryptocurrencies in terms of market cap. Market cap is the total amount of money invested into one specific coin (or also the total market cap which is the total invested into cryptocurrency as a whole). To give you an idea of where the market cap for cryptocurrency currently stands, the market is about half as big as the company Apple. Apple is worth about $900B. Cryptocurrency is currently around $460B. However, that number changes quite a bit on a daily basis.
What Can You Buy Next on Coinbase
To see exactly how to use Coinbase, please watch our step by step tutorial video. It will give you the ins and outs of the cryptocurrency purchasing platform. While we understand what we can currently buy on Coinbase, it is rather fun to speculate about what other coins can possibly be coming to Coinbase soon. Coinbase has shown a propensity to place coins on their site that are on the top tier of crypto market caps. I mentioned four out of the top five coins are currently on Coinbase. So why is Ripple (XRP) not listed since it is number three in market cap?
That’s a good question and has led to quite a bit of speculation. At the beginning of January in 2018, the crypto world was ablaze. This was partly due to the fact that almost everyone in the crypto world believe Ripple was going to debut on Coinbase by the end of January. However, Coinbase announced it would not list Ripple. This was a huge blow to Ripple and led to a huge downturn for the currency.
Many people believe that Ripple, a centralized coin, does not qualify as a coin that Coinbase would list (due to its centralization in nature – all other coins on Coinbase are decentralized). This leads many to believe that Ripple’s decentralized cousin, Stellar Lumens (XLM), could be next on Coinbase. Some other frontrunners for the honor could be NEO, ADA, DASH, & XMR. We hope this information has been helpful!
Our Crypto Thursday videos have been immensely popular with our audience. However, we have yet to do a video on How to buy a Bitcoin with Coinbase. Well, you are in luck because today we are going to show you how to do just that. Coinbase is a super easy website to use… which is probably why it is the premier destination to buy Bitcoins on the internet. The first thing you need to do to buy Bitcoins is to create an account on Coinbase. You can do that by going HERE.
Once you get into your Coinbase account, you will see that there are 4 different coins listed there. The default coin will be Bitcoin. You can see the Bitcoin current price, percentage increase or decrease, and the chart. You can see the chart for several different time increments including 1 hour, 1 day, 1 week, 1 month, 1 year, and all time. This is very useful to be able to see the trend that Bitcoin is currently on.
If Bitcoin is on a spike then it may not be the best time to buy it. You want to wait until what is called a “dip”. This is when a coin has been on an increase and then takes a small decrease. Unless there is some type of bad news surrounding a coin, dips typically go back up pretty quickly. I’m not a financial advisor, but that is my personal opinion on the best way to buy crypto in general according to a chart.
Buying Bitcoin inside of Coinbase is very easy. All you have to do is go to the Buy/Sell tab. From there select Bitcoin and type in the amount you would like to buy. You can use your bank account or debit card.
Why Buy Bitcoin on Coinbase
I’m going to give you my own personal story to show you why I like cryptocurrency so much and why I think it is a good idea to learn how to buy Bitcoin on Coinbase. Several years ago, I began using a software online for one of my businesses. Some point during my use of the software, the creator chose to accept recurring payments in only Bitcoin. The cost to use the software was about $150 every 3 months. It was very confusing to learn how to use Bitcoin around 2012. However, I figured it out and was able to make my purchase. Instead of putting $150 in, I put $165 in my account. After making my payment, I let the extra 120 Bitcoins I had left over sit in my account and I forgot about them.
The next time I had to make my payment, I used a different platform. Several months later, I went back to my account with the $15 worth of Bitcoin left in it. The 120 Bitcoins I had there ballooned from being worth $15 to being worth $2,000. I had made almost two grand by doing nothing. I was terrified that the price would drop again so immediately pulled them out and sold them. At the time, I was extremely happy about my sudden comeuppance. However, fast forward to December of 2017 and those same 120 Bitcoins would have been worth $2.5 million dollars. I still kick myself to this very day, but there is nothing I can do other than learn from my mistakes. As you may be aware of, many people have become millionaires and billionaires from Bitcoin over the last few years. There is no reason to think that trend will not continue.
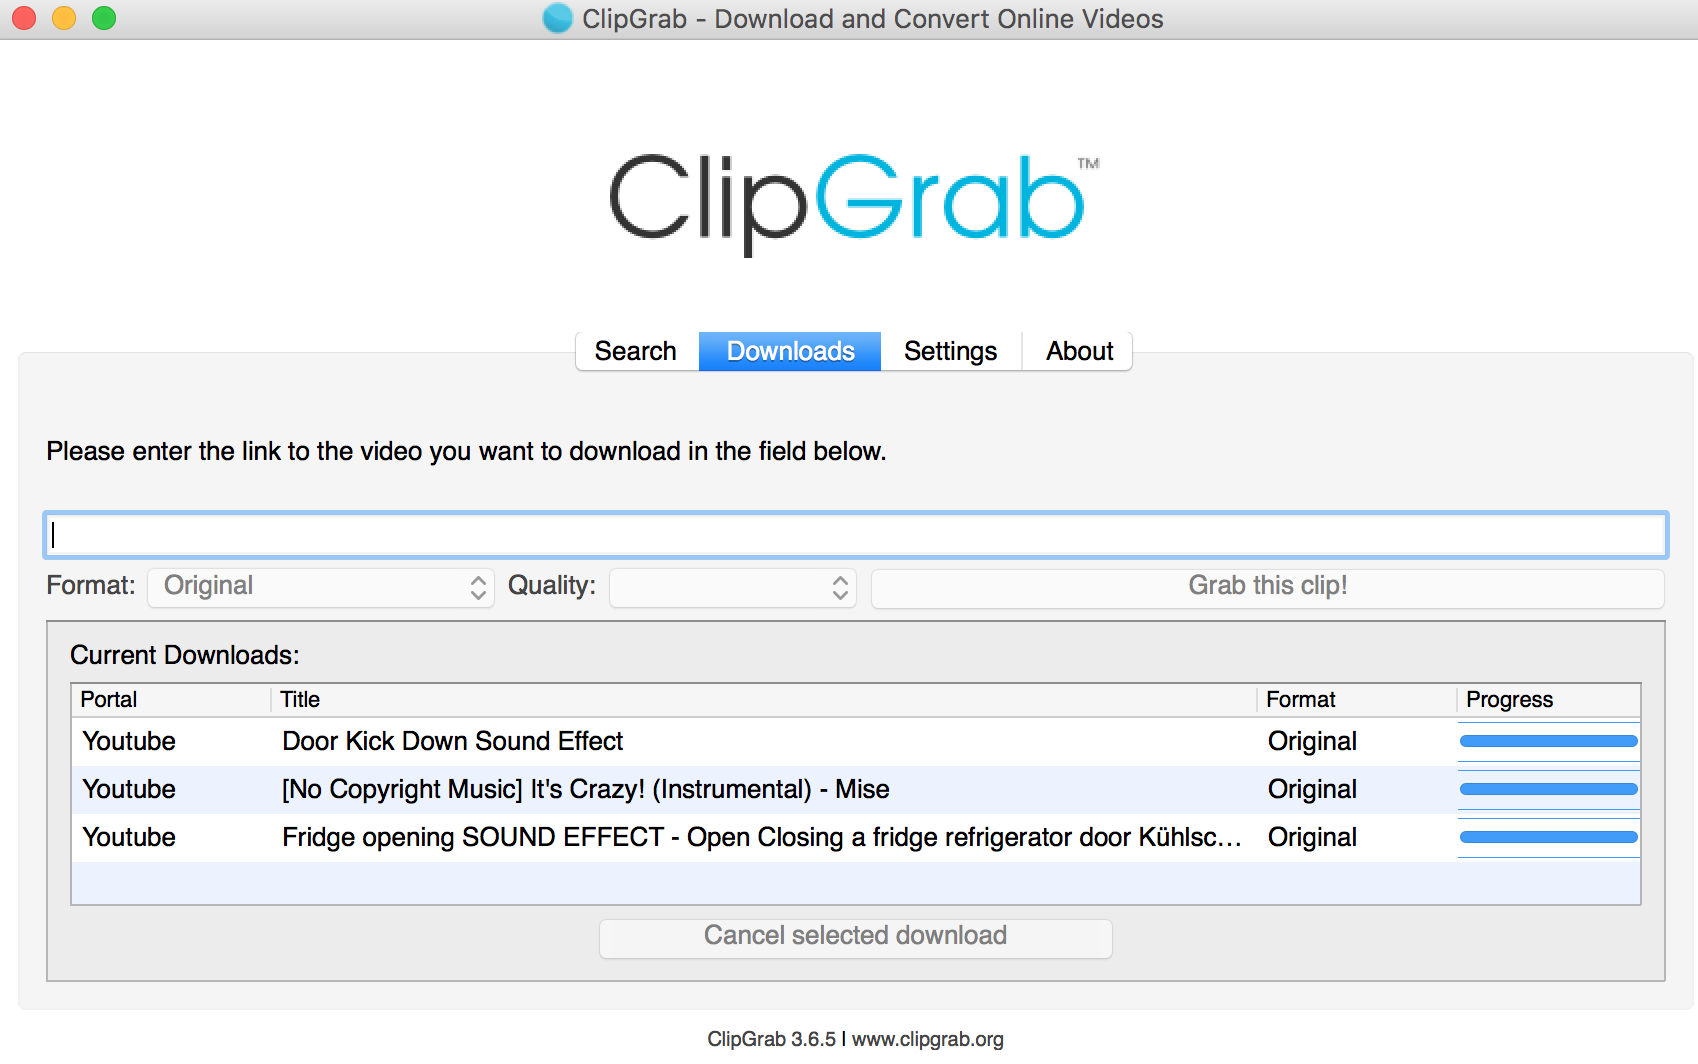
If you have ever wanted to be able to grab a video off of YouTube for you own purposes, then you are in luck because I’m going to show you how to save YouTube Videos with ClipGrab. It’s a common problem for a lot of video editors. You are working on an incredible project, but you are missing a sound effect. All that your project needs is a clear and crisp sound effect of a rainstorm. However, you don’t have a library to go to to find the sound effect. So to try to find a sound effect that will work, you head on over to Google and start searching for “Rain Storm Sound Effect”.
You start scrolling down the page and find several sites with the sound effect. You go to each of them only to find out that they will be glad to give you any sound effect you want; for a monthly fee. Or maybe they offer you the clip at a fixed cost per clip. Either way, you don’t want to pay for a 20 second clip so you decide to keep searching. This time, you search for “Free Rain Storm Sound Effect Clip.” This search leads you to more websites that supposedly have the clip. You click on one of the sites listed only to discover that it is a danger site full of spyware. Sites like this will allow you to download the clip… if you also download a spyware toolbar for your browser!
Then like a beacon of light, you realize that at the very top of the Google search results were two videos of perfect rain storm clips. The issue is, how do you take a YouTube video off of YouTube and on to your desktop?
ClipGrab Makes Saving YouTube Videos Easy
This is where ClipGrab comes in. It is a super easy and simple software that allows you to pull videos directly from YouTube with ease. Head on over to ClipGrab.org in order to download the program. A great feature of this program is that it allows you to use it whether you use a PC or a Mac. Many programs are made specifically for one or the other, but fortunately ClipGrab works for both. When you navigate to the website, ClipGrab will automatically select the version you need for your computer. Download the program and then go through the installation steps.
With this program, learning how to save YouTube videos with ClipGrab is a breeze. In order to grab the rain storm sound effect, all you need to do is navigate to the video you are trying to get in your web browser. Once you are there, copy the URL address for the video. Head on over to your ClipGrab software and paste the URL address in the empty field space in the program. Click “Grab this clip!” It will take a short period of time to process the video. Then just choose the file name and location of where you want the file saved to. Once you have done that, then your video will be saved and you can insert it into your video editing program. You are good to go at this point!
 It’s yet another Crytpo Tutorial Thursday video. Today’s video is “How to Buy WTC”. If you are unfamiliar with WTC, it is the symbol for the cryptocurrency Waltonchain. WaltonChain is based off of an incredible technology and comes from some of the brightest minds in Korea & China. Asian cryptocurrencies such as IOTA & NEO have seen incredible progress and look for Waltonchain to be coming right behind them. Right now the price of WTC is hovering between $18 to $23, but ultimately it will probably get much closer to what NEO is at… which is well over $100 per coin.
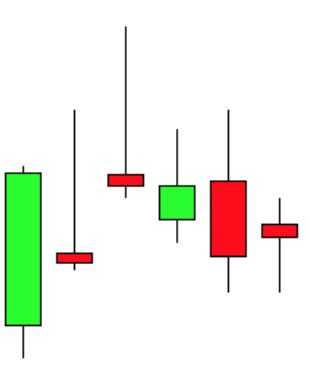 One of the most important thing for crypto investors to learn how to do is how to read a
  Coinigy
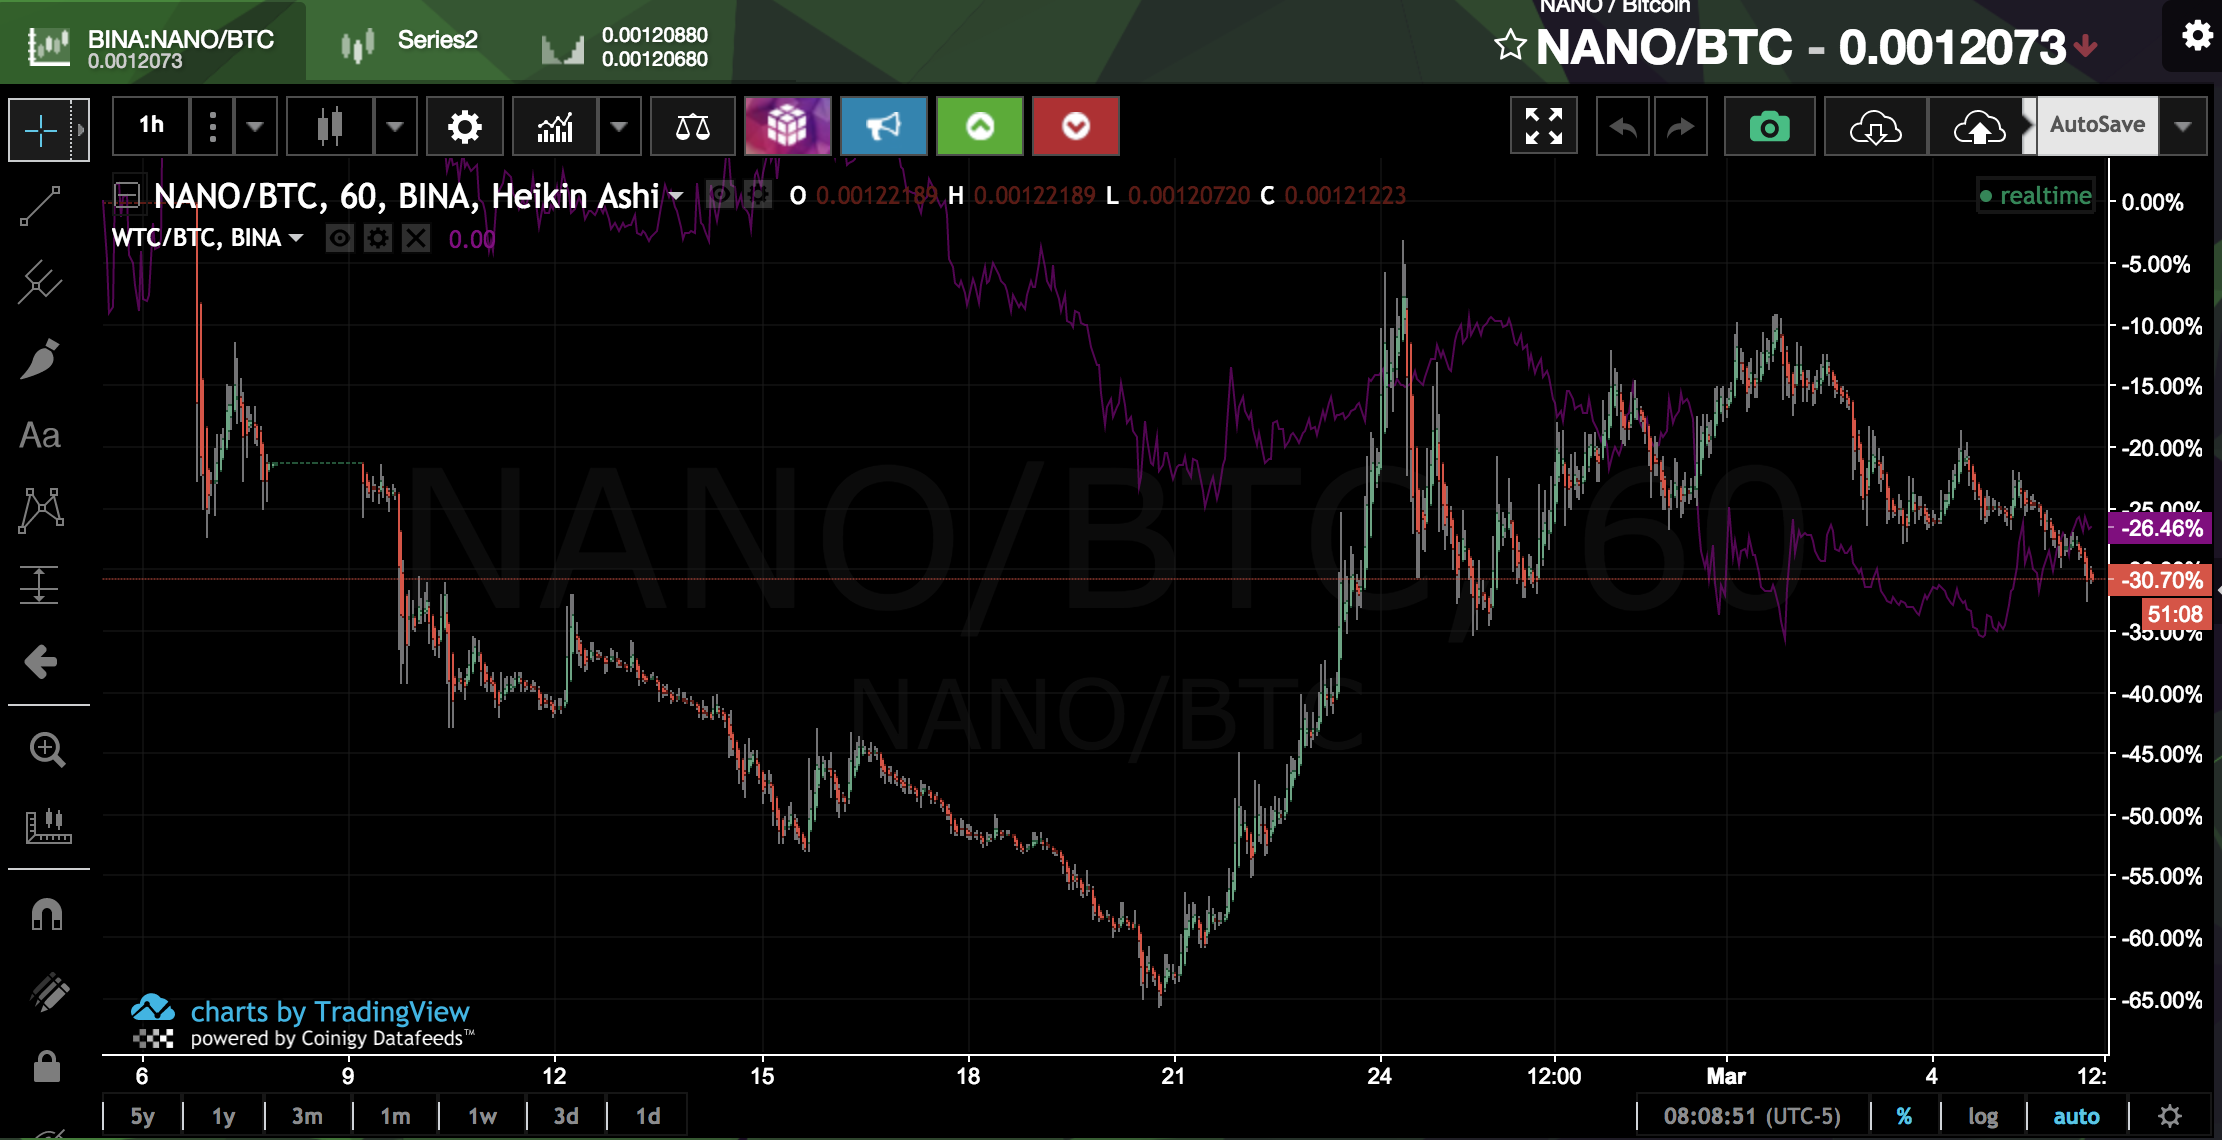
 For last weeks Extra Crypto Friday video, we showed you a full tutorial on how to use the website
 If you have ever ran a social media account for a business, then you are going to want to know how to schedule social media posts with Buffer. Running social media accounts sounds very easy on the surface. Pull up an app on your phone, type in a few words, & you are done. However, anyone who thinks the process is actually that easy doesn’t know what they are talking about. Anyone can type in a few words for a status, but unless you are a celebrity, no one really cares that you are taking your dog for a walk.
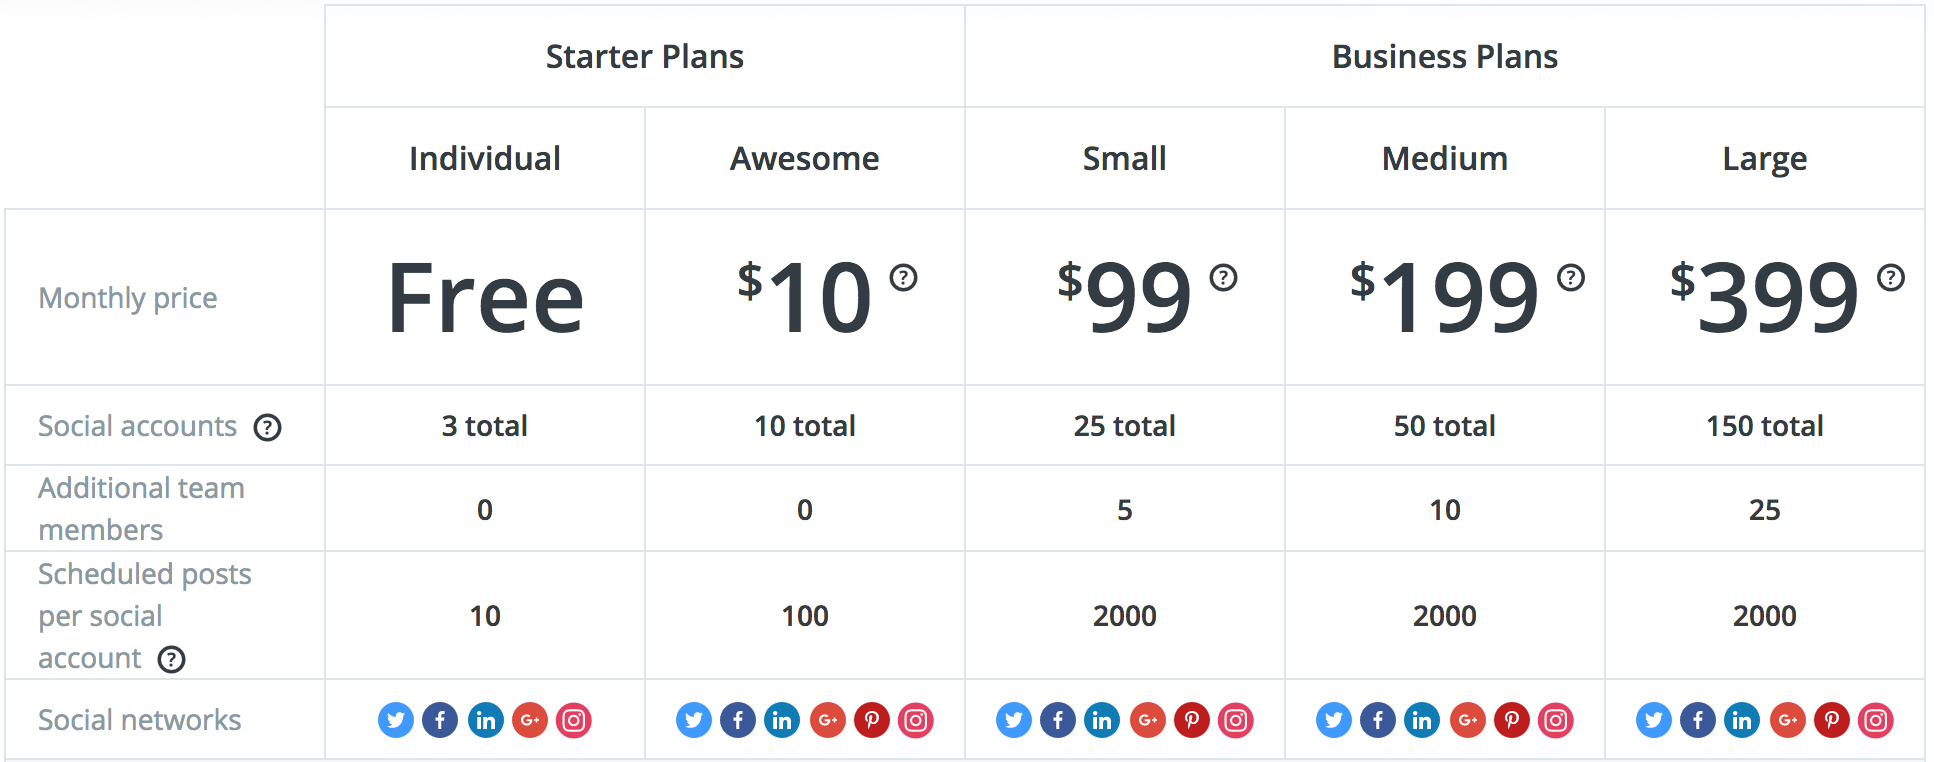
 Today we are continuing our series,
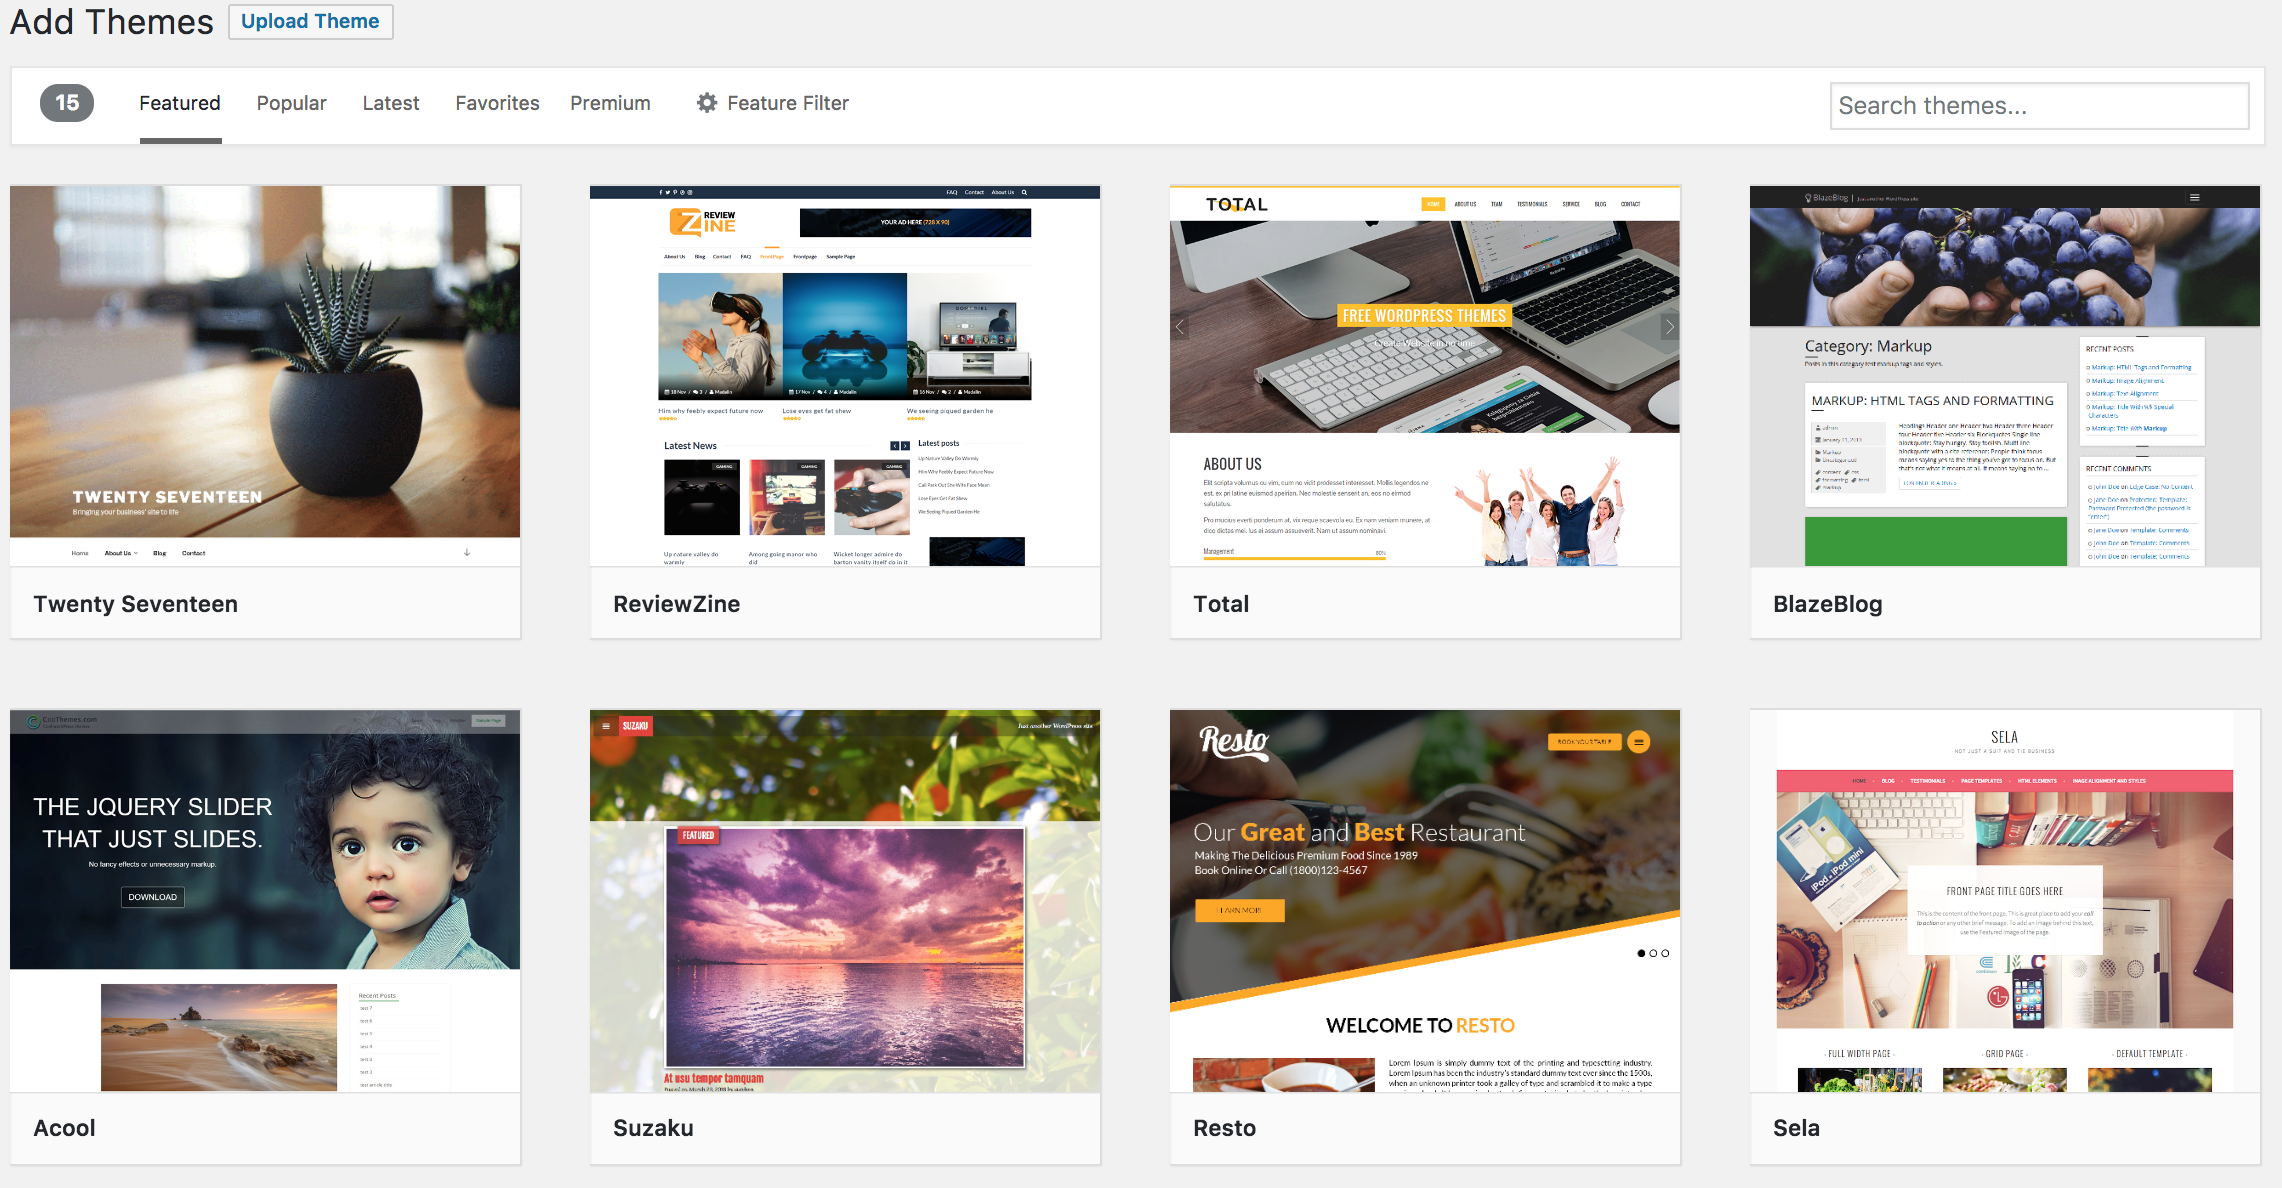
 The next time I had to make my payment, I used a different platform. Several months later, I went back to my account with the $15 worth of Bitcoin left in it. The 120 Bitcoins I had there ballooned from being worth $15 to being worth $2,000. I had made almost two grand by doing nothing. I was terrified that the price would drop again so immediately pulled them out and sold them. At the time, I was extremely happy about my sudden comeuppance. However, fast forward to December of 2017 and those same 120 Bitcoins would have been worth $2.5 million dollars. I still kick myself to this very day, but there is nothing I can do other than learn from my mistakes. As you may be aware of, many people have become millionaires and billionaires from Bitcoin over the last few years. There is no reason to think that trend will not continue.
 If you have ever wanted to be able to grab a