Tag Archives: how to grow a business

Social Media Tips

Schedule Social Media Posts with Buffer

Schedule Social Media Posts with Buffer

schedule social media posts with bufferIf you have ever ran a social media account for a business, then you are going to want to know how to schedule social media posts with Buffer. Running social media accounts sounds very easy on the surface. Pull up an app on your phone, type in a few words, & you are done. However, anyone who thinks the process is actually that easy doesn’t know what they are talking about. Anyone can type in a few words for a status, but unless you are a celebrity, no one really cares that you are taking your dog for a walk.

People who engage with business social media accounts want value. They want the accounts they follow to provide them with content that adds to their lives. When business accounts spam social media platforms with offers, sales, promo videos, & more, people will simply unfollow them. As a business owner yourself, you must find a way to give your followers a regularly scheduled dose of valuable content. This takes a lot of research. You will want to find relevant images, memes, articles, & other content that your readers want to see.

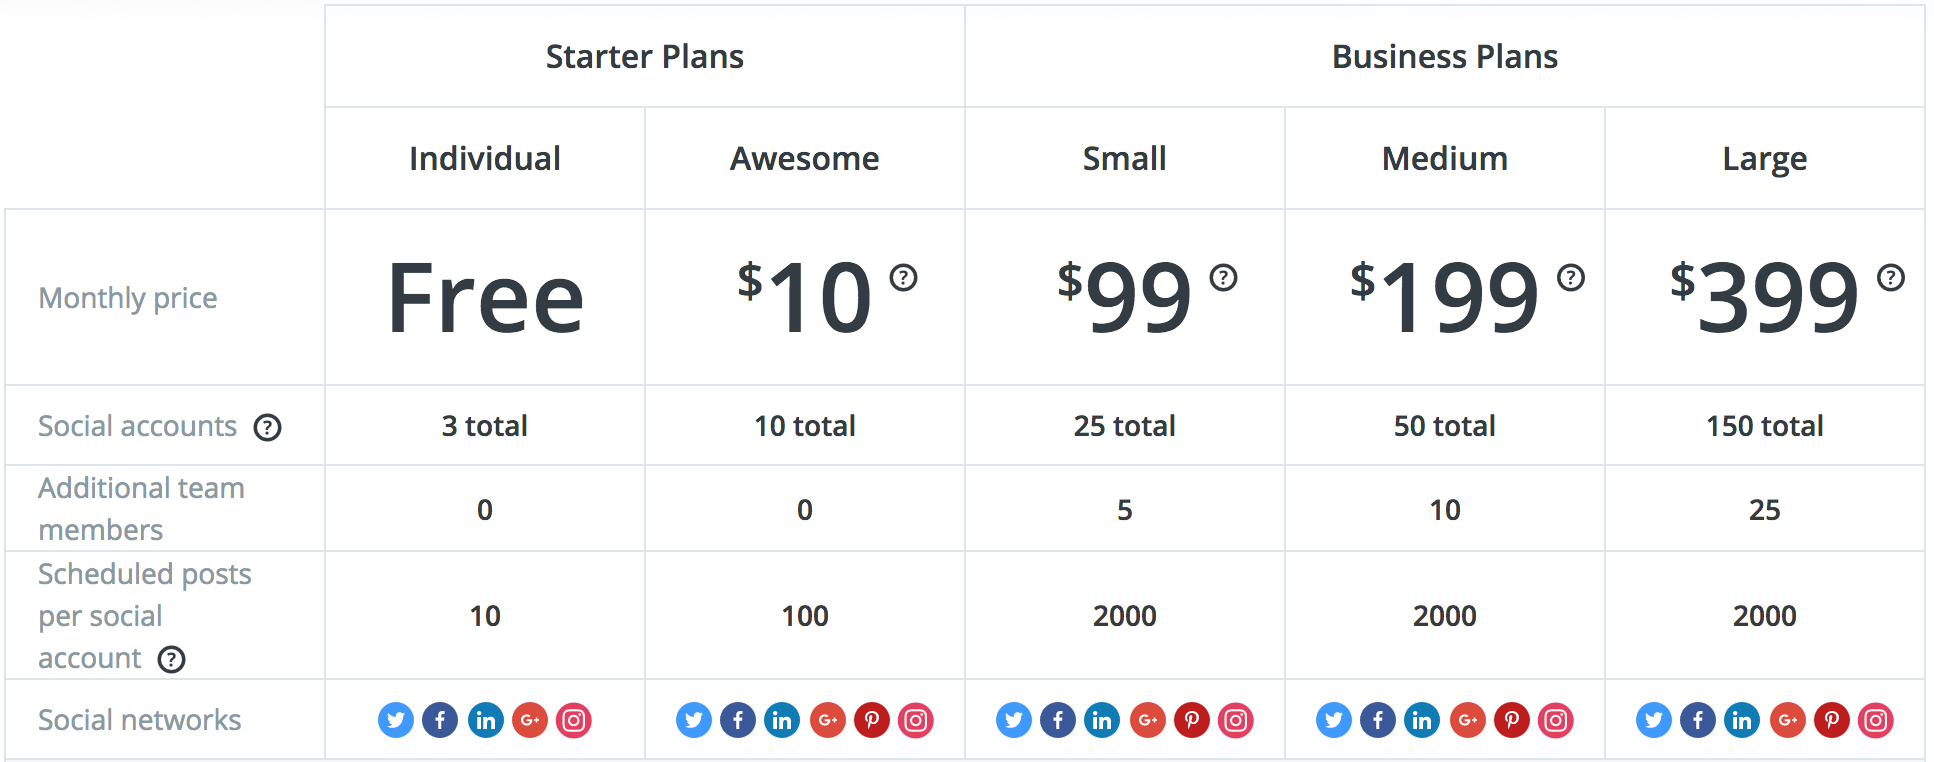
Due to the intense level of workload it takes for a business social media account to be successful, it is absolutely pivotal that business owners either hire a full time social media expert or find an online social media posts scheduler. While the former option can get quite expensive, finding a scheduling program is much more cost effective. A good scheduler will run you between $9.99 to $79.99 per month. Unless you are managing hundreds of accounts, you should never pay anything outside of that range. One social media scheduler we found is Buffer. Our video shows you how to schedule social media posts with Buffer.

Buffer Social Media Scheduler

I discovered Buffer a few weeks ago, and I have really enjoyed using it. For 3 or less social media accounts, Buffer is totally free. One cool thing about Buffer is that it offers a free 14 day trial of one of its upgraded packages. With this package you can manage anywhere from 4-10 social media accounts from a combination of Twitter, Instagram, Facebook, LinkedIn, Google+, & Pinterest.

schedule social media posts with buffer

With Buffer, it is so easy to add social media posts. I have been exclusively using Buffer for Twitter & Facebook. With this program, the control of your schedule is in your hands. You can create a custom schedule to post any number of posts per day. You will want to research how many posts you want to do each day per platform. For instance, on Twitter it’s really ideal to post between 10 to 15 times per day. While on Facebook, 3 per day will be a good amount.

One of the problems I found with Buffer, however, is in regards to Instagram. Buffer does not currently have direct posting to Instagram. Buffer has a phone app that will send you reminders for you to post to Instagram according to your schedule. There is a feature where you can share images directly from your camera roll to Instagram to speed up the process. However, if you want to add text/hashtags then you are still going to have to type or copy them into Instagram manually. There is a note on Buffer that says that hopefully direct Instagram posting is coming down the pipeline.

We hope this post has been helpful. Thanks for reading!

Read More
Website Building

Setting Up Your WordPress Theme

Setting Up Your WordPress Theme

setting up your wordpress themeToday we are continuing our series, Web Wednesdays. In today’s video we are going to be focusing on setting up your WordPress Theme. So this begs the question, what is a WordPress theme?

If this is your first time setting up WordPress, then it is important to understand what a theme is and what it does. The best way to think about it is an anatomical reference. Your blog is the “skin” to your website. It’s what people are going to see the moment they visit your page. Your functionality and content could be incredible, but without the right theme, people will quickly be turned off by your website… and most likely they will leave before they ever get the chance to look under the hood.

While your visitors will see your theme, the theme does also affect the functionality. Each theme comes with settings and/or customization options for things such as your header, sliders, menus, footer, widgets, & more. It is absolutely pivotal that you get to know all of the settings within your header. When I add a new theme to a website I’m working on, the first thing I do is go look at the settings. If the theme does not have settings I like then I will change the theme. There is nothing worse than working with a theme that does not have a lot of customization.

For instance, some themes only allow you to have a text based logo. Just imagine how frustrating it would be to make a beautiful website only to find that it won’t allow you to put your beautifully designed logo at the top of your page. Sure, you could add it within the content… but that is not the best way to brand your business.

Choosing Your WordPress Theme

There are so many different ways to find a WordPress theme. The first question you have to ask yourself is whether or not you would like to spend money on a theme. If you are comfortable paying for a theme, then I suggest strolling over to the Envato Market and searching their Themeforest themes. Most of the themes there run anywhere from $29 to $59. They are fairly priced and these are full themes that will also come with support. Personally, I love Themeforest themes.

If you are looking for a free theme, then you will be able to search within the WordPress platform. It’s easy to search within WordPress for a great theme. The issue with the free themes, is that most likely the themes you find are going to be “Lite” versions of premium themes. The goal of the Lite themes is to give you an idea of what the full version or premium version can offer you above and beyond what you get with the Lite theme. It’s basically a way for these themes to advertise their full version… which of course will come with a cost. Some of the free WordPress themes will offer everything you need, but more times than not you will end up frustrated.

setting up your wordpress th

Thanks for reading & don’t forget to check out our tutorial video, “Setting Up Your WordPress Theme.”

Read More
Website Building

Getting Started With WordPress Dashboard

Getting Started With WordPress Dashboard

getting started with wordpress dashboardThis week, we are continuing with our web series about how to build a website from start to finish. We have already purchased a domain name, set up our hosting, installed WordPress, and now we are getting started with WordPress Dashboard. The first thing you must do before investigating the dashboard, is to login to your site. To do this, type /wp-admin after your domain name. It would look like this: http://www.YourDomainName.com/wp-admin. One quirky aspect of the WordPress admin URL is that the “wp-admin” must be typed in lower case letter only. If you were to type “WP-Admin” then you will not be able to get to your admin. To my knowledge, this is literally the only URL address I have ever encountered where the case of the letter matters.

Once you have pulled up your admin login screen, type in your username and password. My email address never seems to work for any sites I have created with WordPress (between 75-100). You will need to use your username here. If you forget your username or password, click Lost Password. You will be prompted to type in the email address associated with your username and WordPress will email you a reset link. Be careful about this though, because my Password Reset link usually gets sent to my spam instead of my main email inbox. Once you have logged into your account, you can now explore the dashboard.

Making Sense of WordPress

If you have never created a website before, WordPress can be quite intimidating at first. However, the platform is very easy to use with a little practice. One of the most frustrating things that WordPress does in my opinion, is allowing spam on their dashboard. Let me explain. If you go through any hosting service to install your WordPress, the hosting company has agreements in place with companies that integrate themes, widgets, & plugins. These agreements allow them to automatically install plugins & widgets onto your WordPress page.

To an experienced designer, this is not a huge problem because a good designer knows that these plugins are unnecessary. To the novice website builder, these extra plugins make the dashboard confusing. Two of the most common companies I’ve seen are JetPack and MojoMarketplace. To me personally, I have never found any use for either of these.

Plugins can create problems for your website. Certain plugins may cause certain parts of your theme to malfunction. Above all, having several plugins on your website will kill the speed of it. My philosophy is the less plugins, the better. Now of course, plugins are not the devil (even though Bobby Boucher’s mom may disagree!). Plugins are a necessary part of website building. They offer functionality that you will find solve a lot of problems. However, you only need to add plugins that you actually need. For this reason, my preference is to deactivate and delete every single plugin that comes preloaded within my WordPress site. When you delete all of those plugins, you will be amazed at just how much that simple action cleans up and simplifies your WordPress Dashboard.

Our tutorial video “Getting Started with WordPress Dashboard” shows you much more about the WordPress Dashboard.

Read More
Social Media Tips

How to Build Reddit Karma Quickly

How to Build Reddit Karma Quickly

how to build reddit karma quicklyIf you are over 30, there is a chance you don’t even know what Reddit is. If you are under 30, then there is a good chance you have used it extensively. Either way, it is a great idea to get to know it better and learn how to build Reddit Karma quickly. Reddit is an awesome platform to be able to get the word out about your business, product, service, channel, or any other cause you would like to advertise. Reddit is build in such a way that it protects its users from spam. If you are looking to spam your way to the top, then Reddit is not the place for you. If you are looking to promote your business with quality content, then Reddit is one of the best places to do so.

Read More
Website Building

How to Install WordPress – Full Tutorial

How to Install WordPress

how to install wordpressDuring our Web Wednesday series, we have been showing you how to create a website from start to finish. We have walked you through choosing a domain name, choosing a hosting package, & setting your nameservers. Now it is time to move on to the next step and we are going to show you how to install WordPress to your website.

Read More
Tech Tuesdays

How To Create a Whiteboard Explainer Video in Minutes

How to Create a Whiteboard Explainer Video in Minutes

how to create a whiteboard explainer video in minutesWe are going to show you how to create a whiteboard explainer video in minutes. There are many reasons to consider adding an advertising video to your website or social media account. People love videos. They consume them at such an astounding rate that YouTube has now passed Facebook in popularity (in terms of number of monthly visitors). While your marketing video most likely won’t go viral due to its lack of cute babies or frisky felines, it can mean a lot to your business and customers.

Read More
Social Media Tips

How to Set Up Facebook Page Cover Photo

How to Set Up Facebook Page Cover Photo

how to set facebook page cover photoIf you have been looking for a how to set up Facebook page cover photo tutorial, then you have come to the right place. Feel free to watch our video, but also let’s look at why it is important to set up your page correctly. Facebook, as a corporation, feels like it is time to once again change their working algorithm for businesses. Seemingly just like every other business in the world, Facebook wants to appeal to their users and make it more difficult for businesses to advertise to those users. This is good for users but bad for businesses.

Read More
Freedom Fridays

How To Outsource Work With Upwork – Free Up Your Time

Why Outsource with Upwork

outsource with upworkThere is an unseen world when it comes to any digital service. This includes SEO, graphic design, logo design, web design, web development, & much more. Almost every web company on the internet outsources at least some of their work. It’s a problem that comes with being small enough to not turn down any business opportunities and not profitable enough yet to hire additional staff members. Outsourcing can be looked at as the “dirty little secret” of digital services. You would be surprised at just how many of the digital services you have paid for involved situations where companies outsource with Upwork.

Upwork is a large freelancer site. Users can have two different types of accounts there: Freelancer or Client. I will give you my opinion on actually freelancing for Upwork, as I have done it. I don’t suggest it at all. The same reason why we will use it on the client side is the same reason why being a freelancer is not a good deal on Upwork. All of the clients want the most work done for least amount. As a reputable web or graphic designer, that makes for very difficult working conditions. As a freelancer, I found that the expectations of the clients were quite unreasonable. I was basically getting a full-time workload for what would amount to a minimum wage payment (or less). Just a warning: be careful as a freelancer on Upwork.

Outsourcing with Upwork as a Client

The client relationship with Upwork is much easier. If you read the above complaints about being a freelancer on Upwork, then please take that in consideration when you hire people. You are going to be hiring good workers who are diligent. However, it will be hard for them to ever get inside your head to understand what you actually want. Be lenient & communicate well with your freelancers and you will find many of them will go out of their way to try to please you.

As a Client, you can post jobs pretty easily. To see how to post a job, please watch our tutorial video above “Outsource with Upwork”. Once you do this, the key is to find the right candidates for your job. I will reiterate, the most important skill a freelancer will have is communication. Most of them will be able to technically perform what you need… if they understand it. Be very thorough in your vetting process to make sure that the freelancer you hire does, in fact, understand you and communicates well.

outsource with upwork

Be leery of candidates who “over-communicate.” I know that may sound a little opposite of my earlier statement, but communicating well and over-communicating are not the same thing. You want to be able to give your freelancer a job with details included and trust them to complete the job. Of course, some clarification will most likely be necessary. However, if your freelancer is going to call, text, or Skype you 20 times about every task then you might want to consider doing the task yourself. The whole point of outsourcing is to pass the job along to someone else.

We hope this has been helpful for you. Thanks for reading!

Read More
Website Building

How to Set Up Hosting and Nameservers

How to Set Up Hosting and Nameservers

For our Web Wednesday video series, we are  showing you how to build a website from start to finish. In last week’s video we showed you how to choose your hosting package. We recommend using Hostgator as it has a simple to use cPanel that makes setting up a website there very smooth. Once we have chosen our hosting package, now we must learn how to set up hosting and nameservers for our website. It may be a little intimidating at first for those new to website building, but it is actually quite easy.

how to set up hosting and nameservers

The first thing that users will notice when they sign into their Hostgator account, is the interface of the cPanel. The cPanel is the admin by which you can tweak anything having to do with the backend of your website. This includes the File Manager, Redirects, mx Records, & more. A large portion of available sections on the cPanel are virtually useless. If you do not know yet, every site you visit that sells hosting, domains, or online marketing solutions, unashamedly try to push every product under the sun. So pay attention in our “How to Set Up Hosting and Nameservers” tutorial video above and we will reveal to you which icons you actually need to pay attention to.

Setting Your Nameservers

Since GoDaddy (or whatever domain service you own) controls your URL address, you must make GoDaddy communicate with your new hosting company. When someone visits your website, GoDaddy must be able to send visitors directly to where your website is hosted at. To do this, you must be able to let GoDaddy know where to send the visitors to. You do this through setting what are called nameservers.

how to set up hosting and nameservers

If you navigate to the right side of your cPanel and scroll down the page, there is a section that contains your account information. Within that information, your nameservers are listed. They will generally be something like ns32.hostgator.com & ns33.hostgator.com. Your nameservers will always be sequential in number. This makes setting them through GoDaddy fairly easy.

Once you have located your nameservers on Hostgator, highlight and copy the first one by hitting cmd + C for Mac or ctl + C for PC. Navigate to your GoDaddy account. Once you have entered your account, click on “Manage DNS” next to the domain you are looking to host your website on. One of the options you will have on the Manage DNS screen will be to set your nameservers. Initially, “Default Nameservers” will be the current setting. To change the setting to reflect your Hostgator nameservers, simply click “Change”. In the first box, paste the nameserver address you copied in from your Hostgator account information. Then, paste the same address in the second box and simply change the number to reflect your other nameserver. After you have placed both nameserver addresses in the boxes, click save.

And just like that, you are ready to install WordPress! Thanks for reading & don’t forget to watch our tutorial video!

Read More
Tech Tuesdays

Learn to Animate in Less than 10 Minutes

Learn to Animate in Less than 10 Minutes

If you are looking to learn to animate in less than 10 minutes, then you have came to the right place! At the Online Business Realm, we are always showing you tricks, tips, and methods to streamline your online business acumen. On Tech Tuesdays, we go in depth showing you how to do things involving technology, computer programs, & design. Today, we are going to teach you how to animate.

Have you ever had one of those ideas that you just knew is absolute gold, but you had no idea how to even begin to make it possible. It’s like the time I had this idea to create a pillow with a pocket for your iPhone. I told my wife about it and tried to convince her to make some for the Etsy Shop she had at the time. She thought it was a terrible idea and made so much fun of me. I had absolutely no way to make this pillow. Needless to say, the pillow didn’t get made. No less than 12 months later, guess what pops on my TV Screen… but an infomercial for a pillow with a pocket. There it was. $19.99 for two as a matter of fact!

The point of that story is sometimes when you get a good idea you have to go for it. I had one of those ideas pop into my recently about creating a cartoon. The only problem was I had no idea how to animate, and finding a professional animator was going to cost way too much money. Remembering my pillow with a pocket snafu, I decided that anything I don’t know, I will learn. I will not let another idea pass me buy. So I learned how to animate in one weekend.

Using Adobe Animate to Create Videos

When I first started using Adobe Create Cloud, I only had it for Photoshop. I never dreamed that one day I would be able to use the majority of the apps within Creative Cloud. As of this weekend, I have now added a new skill to my Adobe repertoire, as I learned how to use Adobe Animate. And I was able to learn how to animate in less than 10 minutes. It is very similar and has a lot of the same tools & functions as other Adobe products. That makes the learning curve much less steep than it would be for a first time Adobe user.

The most confusing thing about using Adobe Animate is learning how to make the objects move. My first attempt at animation involved manually moving each object frame by frame. However, I knew there had to be a simpler way to animate simple shapes. Then I discovered how to use the Classic Tween. Using the Classic Tween is extremely simple and allows your objects to move evenly and fluidly throughout an animation. To see exactly how to use the Classic Tween & to see how to learn to animate in less than 10 minutes, please watch the tutorial video above!

Thanks for reading & good luck!

Read More
1 2