Tag Archives: make money online

Extra Crypto Fridays

How to Use Coinbase – Full Tutorial

How to Use Coinbase

how to use coinbaseWe have shown you how to buy several different cryptocurrencies in our videos, tutorials, & posts. However, we have yet to show you a full tutorial video on how to use Coinbase. Without an understanding of how Coinbase works, it will be difficult to understand any of our other videos. For that reason, we wanted to make this blog post to show you how to use Coinbase.

Coinbase is a simple website to use. However, for many people just the idea of making the jump from researching Bitcoin to buying Bitcoin can be a massive leap of faith. If you read our last post, then you know why we are big believers in Bitcoin & cryptocurrency. Try Coinbase out for yourself! It is a great site and cryptocurrency is a fun hobby.

Coinbase has four cryptocurrencies currently listed on the site. They are Bitcoin, Ethereum, Litecoin, & Bitcoin Cash. These four cryptocurrencies make up four out of the top five cryptocurrencies in terms of market cap. Market cap is the total amount of money invested into one specific coin (or also the total market cap which is the total invested into cryptocurrency as a whole). To give you an idea of where the market cap for cryptocurrency currently stands, the market is about half as big as the company Apple. Apple is worth about $900B. Cryptocurrency is currently around $460B. However, that number changes quite a bit on a daily basis.

What Can You Buy Next on Coinbase

To see exactly how to use Coinbase, please watch our step by step tutorial video. It will give you the ins and outs of the cryptocurrency purchasing platform. While we understand what we can currently buy on Coinbase, it is rather fun to speculate about what other coins can possibly be coming to Coinbase soon. Coinbase has shown a propensity to place coins on their site that are on the top tier of crypto market caps. I mentioned four out of the top five coins are currently on Coinbase. So why is Ripple (XRP) not listed since it is number three in market cap?

how to use coinbase

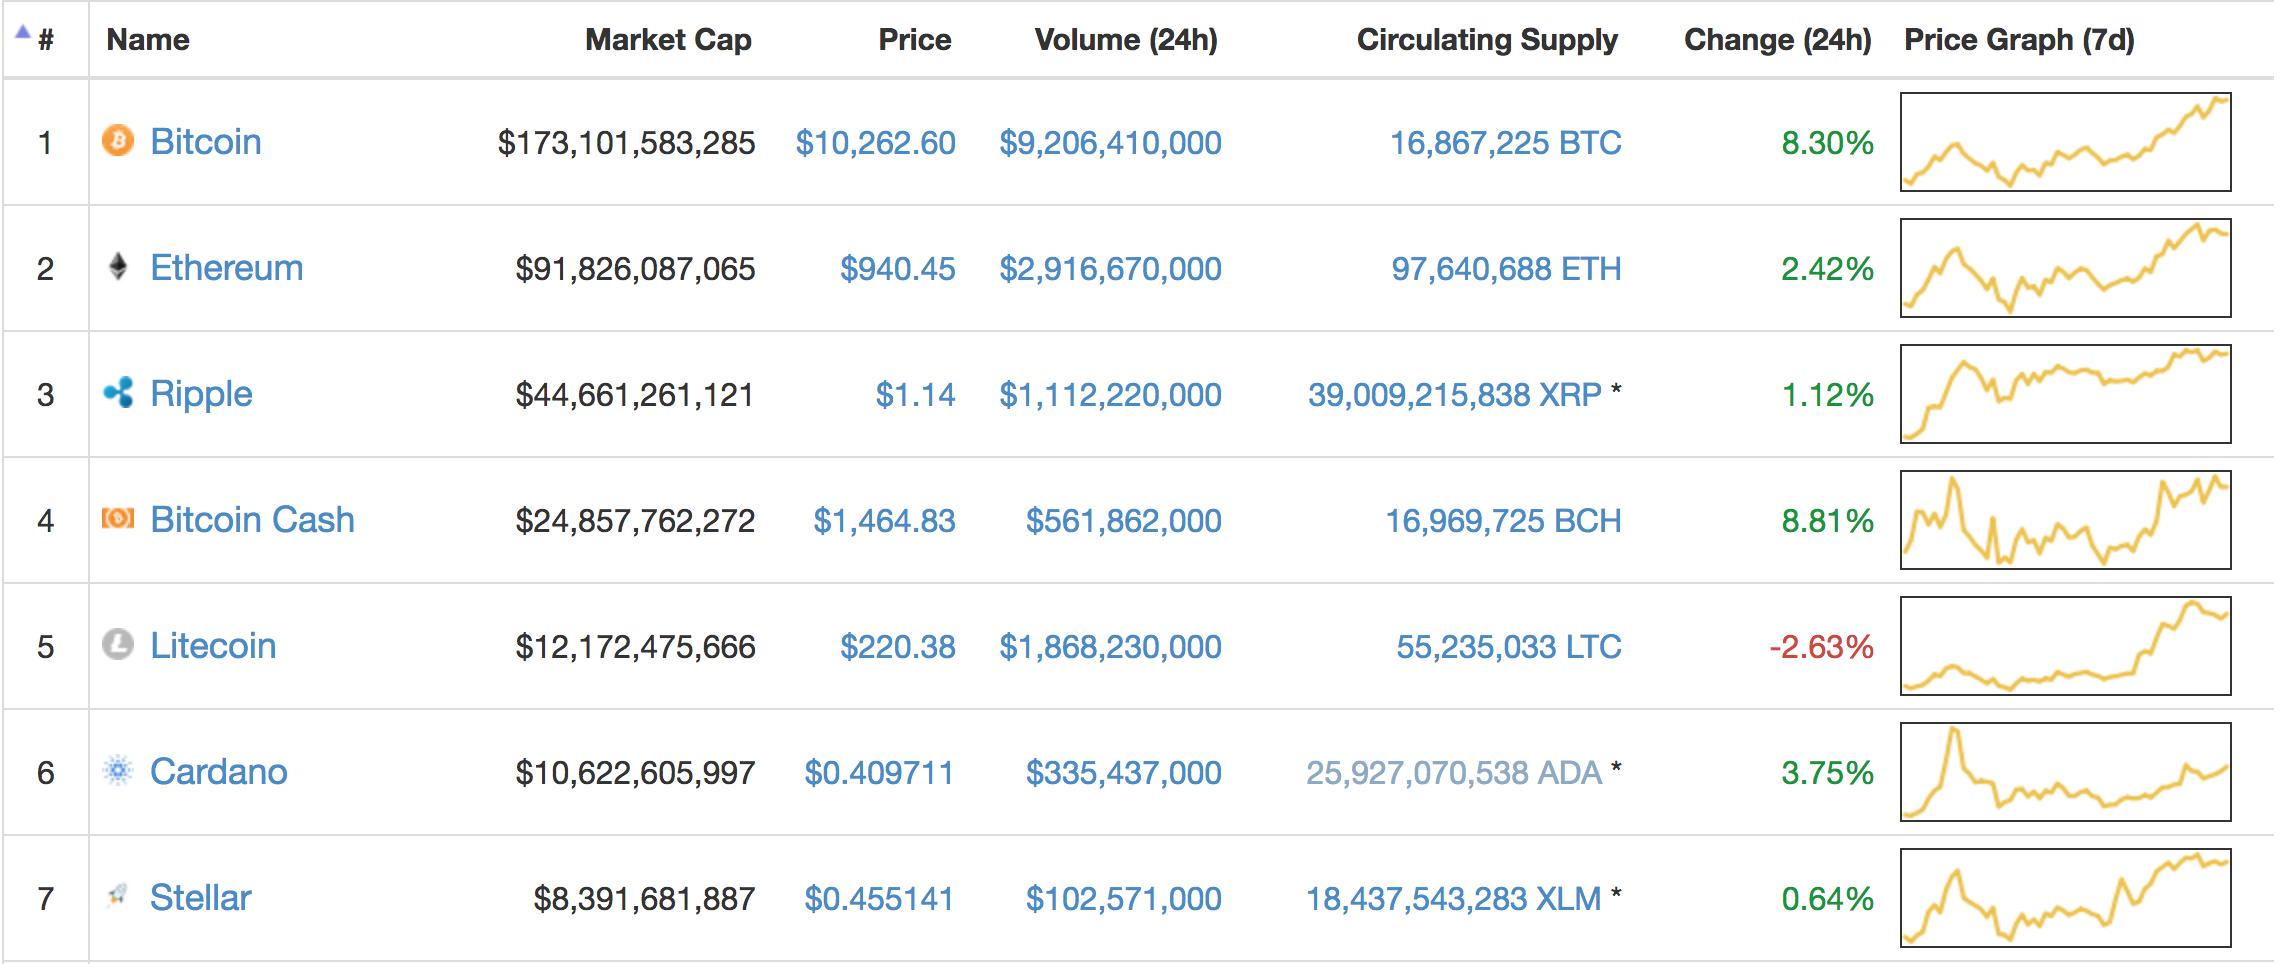
That’s a good question and has led to quite a bit of speculation. At the beginning of January in 2018, the crypto world was ablaze. This was partly due to the fact that almost everyone in the crypto world believe Ripple was going to debut on Coinbase by the end of January. However, Coinbase announced it would not list Ripple. This was a huge blow to Ripple and led to a huge downturn for the currency.

Many people believe that Ripple, a centralized coin, does not qualify as a coin that Coinbase would list (due to its centralization in nature – all other coins on Coinbase are decentralized). This leads many to believe that Ripple’s decentralized cousin, Stellar Lumens (XLM), could be next on Coinbase. Some other frontrunners for the honor could be NEO, ADA, DASH, & XMR. We hope this information has been helpful!

Thanks for reading!

Read More
Crypto Thursdays

How to Buy A Bitcoin with Coinbase

How to Buy A Bitcoin with Coinbase

how to buy bitcoin on coinbaseOur Crypto Thursday videos have been immensely popular with our audience. However, we have yet to do a video on How to buy a Bitcoin with Coinbase. Well, you are in luck because today we are going to show you how to do just that. Coinbase is a super easy website to use… which is probably why it is the premier destination to buy Bitcoins on the internet. The first thing you need to do to buy Bitcoins is to create an account on Coinbase. You can do that by going HERE.

Once you get into your Coinbase account, you will see that there are 4 different coins listed there. The default coin will be Bitcoin. You can see the Bitcoin current price, percentage increase or decrease, and the chart. You can see the chart for several different time increments including 1 hour, 1 day, 1 week, 1 month, 1 year, and all time. This is very useful to be able to see the trend that Bitcoin is currently on.

If Bitcoin is on a spike then it may not be the best time to buy it. You want to wait until what is called a “dip”. This is when a coin has been on an increase and then takes a small decrease. Unless there is some type of bad news surrounding a coin, dips typically go back up pretty quickly. I’m not a financial advisor, but that is my personal opinion on the best way to buy crypto in general according to a chart.

Buying Bitcoin inside of Coinbase is very easy. All you have to do is go to the Buy/Sell tab. From there select Bitcoin and type in the amount you would like to buy. You can use your bank account or debit card.

Why Buy Bitcoin on Coinbase

I’m going to give you my own personal story to show you why I like cryptocurrency so much and why I think it is a good idea to learn how to buy Bitcoin on Coinbase. Several years ago, I began using a software online for one of my businesses. Some point during my use of the software, the creator chose to accept recurring payments in only Bitcoin. The cost to use the software was about $150 every 3 months. It was very confusing to learn how to use Bitcoin around 2012. However, I figured it out and was able to make my purchase. Instead of putting $150 in, I put $165 in my account. After making my payment, I let the extra 120 Bitcoins I had left over sit in my account and I forgot about them.

how to buy bitcoin with coinbaseThe next time I had to make my payment, I used a different platform. Several months later, I went back to my account with the $15 worth of Bitcoin left in it. The 120 Bitcoins I had there ballooned from being worth $15 to being worth $2,000. I had made almost two grand by doing nothing. I was terrified that the price would drop again so immediately pulled them out and sold them. At the time, I was extremely happy about my sudden comeuppance. However, fast forward to December of 2017 and those same 120 Bitcoins would have been worth $2.5 million dollars. I still kick myself to this very day, but there is nothing I can do other than learn from my mistakes. As you may be aware of, many people have become millionaires and billionaires from Bitcoin over the last few years. There is no reason to think that trend will not continue.


Read More
Tech Tuesdays

How to Save YouTube Videos with ClipGrab

How to Save YouTube Videos with ClipGrab

how to save youtube videos with clipgrabIf you have ever wanted to be able to grab a video off of YouTube for you own purposes, then you are in luck because I’m going to show you how to save YouTube Videos with ClipGrab. It’s a common problem for a lot of video editors. You are working on an incredible project, but you are missing a sound effect. All that your project needs is a clear and crisp sound effect of a rainstorm. However, you don’t have a library to go to to find the sound effect. So to try to find a sound effect that will work, you head on over to Google and start searching for “Rain Storm Sound Effect”.

You start scrolling down the page and find several sites with the sound effect. You go to each of them only to find out that they will be glad to give you any sound effect you want; for a monthly fee. Or maybe they offer you the clip at a fixed cost per clip. Either way, you don’t want to pay for a 20 second clip so you decide to keep searching. This time, you search for “Free Rain Storm Sound Effect Clip.” This search leads you to more websites that supposedly have the clip. You click on one of the sites listed only to discover that it is a danger site full of spyware. Sites like this will allow you to download the clip… if you also download a spyware toolbar for your browser!

Then like a beacon of light, you realize that at the very top of the Google search results were two videos of perfect rain storm clips. The issue is, how do you take a YouTube video off of YouTube and on to your desktop?

ClipGrab Makes Saving YouTube Videos Easy

This is where ClipGrab comes in. It is a super easy and simple software that allows you to pull videos directly from YouTube with ease. Head on over to ClipGrab.org in order to download the program. A great feature of this program is that it allows you to use it whether you use a PC or a Mac. Many programs are made specifically for one or the other, but fortunately ClipGrab works for both. When you navigate to the website, ClipGrab will automatically select the version you need for your computer. Download the program and then go through the installation steps.

how to save youtube videos with clipgrab

With this program, learning how to save YouTube videos with ClipGrab is a breeze. In order to grab the rain storm sound effect, all you need to do is navigate to the video you are trying to get in your web browser. Once you are there, copy the URL address for the video. Head on over to your ClipGrab software and paste the URL address in the empty field space in the program. Click “Grab this clip!” It will take a short period of time to process the video. Then just choose the file name and location of where you want the file saved to. Once you have done that, then your video will be saved and you can insert it into your video editing program. You are good to go at this point!

Thanks for reading and good luck!

Read More
Social Media Tips

How to Build Reddit Karma Quickly

How to Build Reddit Karma Quickly

how to build reddit karma quicklyIf you are over 30, there is a chance you don’t even know what Reddit is. If you are under 30, then there is a good chance you have used it extensively. Either way, it is a great idea to get to know it better and learn how to build Reddit Karma quickly. Reddit is an awesome platform to be able to get the word out about your business, product, service, channel, or any other cause you would like to advertise. Reddit is build in such a way that it protects its users from spam. If you are looking to spam your way to the top, then Reddit is not the place for you. If you are looking to promote your business with quality content, then Reddit is one of the best places to do so.

Read More
Crypto Thursdays Extra Crypto Fridays

MyEtherWallet Tutorial

MyEtherWallet Tutorial

myetherwallet tutorialWe have had such a great response to our Crypto Thursday videos, that we have decided to post more cryptocurrency videos & tutorials. While Thursdays will still consist of videos showing you how to buy specific coins (and additional info about each coin), on Fridays we will be reaching out to other areas of cryptocurrency such as wallets, chart reading info, and more. We are very excited about this and hope that you will be as well.

For today’s video & blog, we are taking a look at a MyEtherWallet tutorial. MyEtherWallet is an online wallet where you can hold any token on the ERC-20 network. The ERC-20 network is better known as the Ethereum Network. While Ethereum is the base for the network, there are several other tokens that are also on the network. Some of these include, EOS, Quantum, Tron, & Internet Node Token. The fact that you can own all of these tokens and keep them on the same wallet is a huge plus to creating a wallet here.

The wallet is pretty straight forward and offers many standard features of a wallet. It offers support for a hardware wallet such as Trezor or Ledger. MyEtherWallet provides you with multiple ways to unlock your wallet after you create it. The two easiest ways are with either the Keystore File the site provides you with or the Private Key the site provides you with. MyEtherWallet suggests using some other methods, but those are the two easiest ways (and most likely what normal investors are using). You are given both of these tools in the sign-up process.

MyEtherWallet Problems

Personally, I love MyEtherWallet. It’s a great wallet, but there are two common problems people run into with this wallet. First, because of the nature of the online storage of this wallet, if you lose your Private Key or Keystore File and are unable to get into your account, then you will indefinitely lose whatever tokens are in your wallet. MyEtherWallet cannot help you to restore them. For this reason, there are warnings MyEtherWallet gives you as you sign up detailing how to protect your account. Phishing is extremely common for this wallet. Just use common sense and you should be fine. The best way to avoid phishing is to only go directly to the site by typing the URL in the address bar instead of ever clicking a link to go to it.

The second problem people have is they have a hard time figuring out how to send tokens away from MyEtherWallet. If you look up on the top right of the wallet, you will see this information:

myetherwallet tutorial

If you are unfamiliar with the Ethereum Network, you may think this is the stock price for gasoline. However, Gwei (or Giga wei), is the fuel that runs the network. In order to send tokens back to an exchange from MyEtherWallet you must have Ethereum also stored on your wallet. It doesn’t have to be much, but you need some to cover the transfer fees for your other tokens. I suggest adding about $10 worth of Ethereum to your account before you ever add tokens. This way you will have your transaction fees covered for a while.

To find out more about this wallet, please watch our “MyEtherWallet Tutorial”. Thanks for reading!

Read More
Crypto Thursdays

How to Buy NEOGAS

How to Buy NEOGAS

how to buy neogasIf you have been paying attention during the latest bear run on the cryptocurrency market, then you have seen a few coins that seemed to be able to take the blows better than other. Three coins that seemed to stand tough during the dip were Waltonchain, NEO, & GAS. Don’t be confused by the title of this article, How to Buy NEOGAS. NEO & GAS are two different tokens, but they are on the same platform. They are attached at the hip. When NEO drops in price, GAS is usually follows the same trend. If NEO goes on a bull run, then GAS is also not far behind. Currently, GAS has been staying at about 30-50% of NEO’s price. So let’s look at the relationship between the two coins.

NEO and GAS both have 100 million tokes as their total possible supply. The thing that separates the two from each other is that NEO cannot be divided. GAS, however, can be divided into smaller shares distributed across the total supply of coins. While I personally do not believe that GAS will ever be able to pass NEO, the ability to divide the coins does make it likely that one day the price of GAS may get much higher than 30% of NEO’s price.

When it comes to choosing NEO or GAS as a coin to invest in, my advice would be to actually make a choice. They are both great coins with strong futures, but since their movements seem to mimic one another, it would be better to invest in only one of the coins. This would allow you to allocate part of your portfolio to other coins with potential. Now that you understand a little about NEO & GAS, let’s look at how to buy NEOGAS.

how to buy neogas

Using Kucoin to Buy NEOGAS

While technically the name of the token we are looking at is NEOGAS, you will most likely only find it under the name GAS on most exchanges. You can buy GAS on many bigger exchanges such as Binance. The exchange we will be looking at is Kucoin. The Kucoin exchange is unique because it offers more options than just trading ETH or BTC for its coins. You can actually trade NEO on this platform (which demonstrates the usefulness of NEO itself).

Before you begin to learn how to buy NEOGAS, you need to be able to get your money on an exchange. The obvious choice is Coinbase. Chances are that if you are looking into how to buy altcoins such as NEO or GAS, that you already have experience with Coinbase. If this is your first time moving your money from Coinbase to an exchange, then welcome to the real crypto world!

On Kucoin, hover over the $ symbol on the top of the page. Then move your cursor down to click on “Deposit”. The default coin to trade with on Kucoin is KCS. This stands for Kucoin shares and is the coin ran by the exchange. Simple click the dropdown to select Bitcoin from the list. Then send your BTC from Coinbase to the Kucoin BTC address you are provided with. From that point, all you need to do is make the actual exchange. To see exactly how this is done, watch the tutorial video, “How to Buy NEOGAS”. It’s a very simple process.

Thanks for reading and good luck with your crypto investments!

Read More
Website Building

How to Install WordPress – Full Tutorial

How to Install WordPress

how to install wordpress
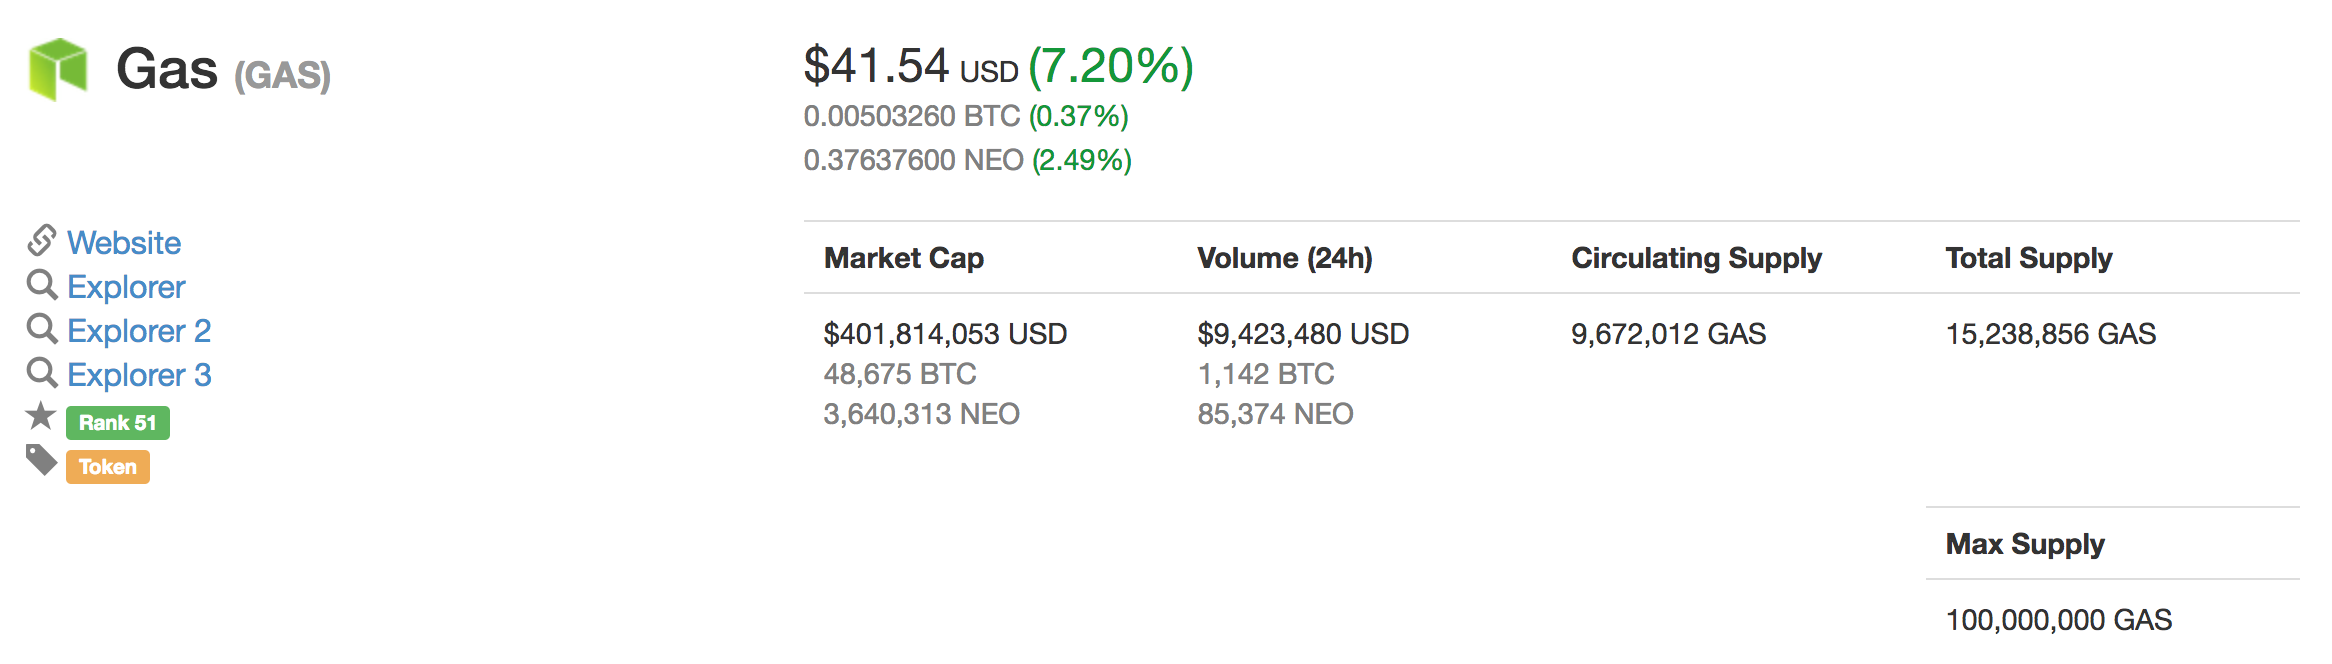
During our Web Wednesday series, we have been showing you how to create a website from start to finish. We have walked you through choosing a domain name, choosing a hosting package, & setting your nameservers. Now it is time to move on to the next step and we are going to show you how to install WordPress to your website.

Read More
Tech Tuesdays

How To Create a Whiteboard Explainer Video in Minutes

How to Create a Whiteboard Explainer Video in Minutes

how to create a whiteboard explainer video in minutesWe are going to show you how to create a whiteboard explainer video in minutes. There are many reasons to consider adding an advertising video to your website or social media account. People love videos. They consume them at such an astounding rate that YouTube has now passed Facebook in popularity (in terms of number of monthly visitors). While your marketing video most likely won’t go viral due to its lack of cute babies or frisky felines, it can mean a lot to your business and customers.

Read More
Website Building

How to Set Up Hosting and Nameservers

How to Set Up Hosting and Nameservers

For our Web Wednesday video series, we areĀ  showing you how to build a website from start to finish. In last week’s video we showed you how to choose your hosting package. We recommend using Hostgator as it has a simple to use cPanel that makes setting up a website there very smooth. Once we have chosen our hosting package, now we must learn how to set up hosting and nameservers for our website. It may be a little intimidating at first for those new to website building, but it is actually quite easy.

how to set up hosting and nameservers

The first thing that users will notice when they sign into their Hostgator account, is the interface of the cPanel. The cPanel is the admin by which you can tweak anything having to do with the backend of your website. This includes the File Manager, Redirects, mx Records, & more. A large portion of available sections on the cPanel are virtually useless. If you do not know yet, every site you visit that sells hosting, domains, or online marketing solutions, unashamedly try to push every product under the sun. So pay attention in our “How to Set Up Hosting and Nameservers” tutorial video above and we will reveal to you which icons you actually need to pay attention to.

Setting Your Nameservers

Since GoDaddy (or whatever domain service you own) controls your URL address, you must make GoDaddy communicate with your new hosting company. When someone visits your website, GoDaddy must be able to send visitors directly to where your website is hosted at. To do this, you must be able to let GoDaddy know where to send the visitors to. You do this through setting what are called nameservers.

how to set up hosting and nameservers

If you navigate to the right side of your cPanel and scroll down the page, there is a section that contains your account information. Within that information, your nameservers are listed. They will generally be something like ns32.hostgator.com & ns33.hostgator.com. Your nameservers will always be sequential in number. This makes setting them through GoDaddy fairly easy.

Once you have located your nameservers on Hostgator, highlight and copy the first one by hitting cmd + C for Mac or ctl + C for PC. Navigate to your GoDaddy account. Once you have entered your account, click on “Manage DNS” next to the domain you are looking to host your website on. One of the options you will have on the Manage DNS screen will be to set your nameservers. Initially, “Default Nameservers” will be the current setting. To change the setting to reflect your Hostgator nameservers, simply click “Change”. In the first box, paste the nameserver address you copied in from your Hostgator account information. Then, paste the same address in the second box and simply change the number to reflect your other nameserver. After you have placed both nameserver addresses in the boxes, click save.

And just like that, you are ready to install WordPress! Thanks for reading & don’t forget to watch our tutorial video!

Read More
Tech Tuesdays

Learn to Animate in Less than 10 Minutes

Learn to Animate in Less than 10 Minutes

If you are looking to learn to animate in less than 10 minutes, then you have came to the right place! At the Online Business Realm, we are always showing you tricks, tips, and methods to streamline your online business acumen. On Tech Tuesdays, we go in depth showing you how to do things involving technology, computer programs, & design. Today, we are going to teach you how to animate.

Have you ever had one of those ideas that you just knew is absolute gold, but you had no idea how to even begin to make it possible. It’s like the time I had this idea to create a pillow with a pocket for your iPhone. I told my wife about it and tried to convince her to make some for the Etsy Shop she had at the time. She thought it was a terrible idea and made so much fun of me. I had absolutely no way to make this pillow. Needless to say, the pillow didn’t get made. No less than 12 months later, guess what pops on my TV Screen… but an infomercial for a pillow with a pocket. There it was. $19.99 for two as a matter of fact!

The point of that story is sometimes when you get a good idea you have to go for it. I had one of those ideas pop into my recently about creating a cartoon. The only problem was I had no idea how to animate, and finding a professional animator was going to cost way too much money. Remembering my pillow with a pocket snafu, I decided that anything I don’t know, I will learn. I will not let another idea pass me buy. So I learned how to animate in one weekend.

Using Adobe Animate to Create Videos

When I first started using Adobe Create Cloud, I only had it for Photoshop. I never dreamed that one day I would be able to use the majority of the apps within Creative Cloud. As of this weekend, I have now added a new skill to my Adobe repertoire, as I learned how to use Adobe Animate. And I was able to learn how to animate in less than 10 minutes. It is very similar and has a lot of the same tools & functions as other Adobe products. That makes the learning curve much less steep than it would be for a first time Adobe user.

The most confusing thing about using Adobe Animate is learning how to make the objects move. My first attempt at animation involved manually moving each object frame by frame. However, I knew there had to be a simpler way to animate simple shapes. Then I discovered how to use the Classic Tween. Using the Classic Tween is extremely simple and allows your objects to move evenly and fluidly throughout an animation. To see exactly how to use the Classic Tween & to see how to learn to animate in less than 10 minutes, please watch the tutorial video above!

Thanks for reading & good luck!

Read More
1 2 3 4 5